Most people use community packages to do something as trivial as setting up a Menu on a sidebar. In my opinion, it takes more time to understand the API of a package than it takes to build the Menu from scratch. In this tutorial, I will show how you can build your own Menu using React router and SASS.
Scaffold a React app
For scaffolding a React app, please feel to use create-react-app (CRA) or Parcel. There is already a small tutorial I have written on how to setup a React app using Parcel. I do not want to repeat it here.
Our React app has only three pages: Home, About, Contact. There is a sidebar on the left side which has the Menu. The focus of this blog post is how to build the Menu from scratch and highlight some of the details.
React Router setup
Install react-router-dom using yarn add react-router-dom. React router version 4 is a great improvement over its previous versions. Now, we can use the Routes component anywhere in the markup.
Create App component (App.js)
import React from 'react';
import { BrowserRouter } from 'react-router-dom';
import Layout from './Layout';

export default function App() {
    return (
        <BrowserRouter>
            <Layout />
        </BrowserRouter>
    )
}
We use BrowserRouter. Within the router, there is the Layout component. This component has all the routes.
Create Layout component (Layout.js)
import React from "react";
import { Switch, Route } from 'react-router-dom';
import Home from './Home';
import About from './About';
import Contact from './Contact';

export default function Layout() {
  return (
    <div className="app">
      <div className="app__sidebar" />
      <main className="app__content">
        <Switch>
          <Route path="/about" component={About} />
          <Route path="/contact" component={Contact} />
          <Route path="/" component={Home} />
        </Switch>
      </main>
    </div>
  );
}
The layout has a left sidebar and the main content element. We will style these later. Within the main section, the router displays either the Home component, About component or the Contact component depending on the route.
Create three dummy components, Home.js, About.js, Contact.js each of which displays some text.
Finally, open up index.js and use the App component.
import React from 'react';
import ReactDOM from 'react-dom';
import App from './App';

ReactDOM.render(<App />, document.getElementById('root'));
Now, if we run the app and browse to localhost:1234, we see the Home page. And if we move to /about, we see the About page. So, the react-router setup is working great. Let’s now do some styling using SASS. In the process, we will learn a little bit of BEM methodology.
Basic styling for Layout page
Add an index.scss and import it from index.js.
import './index.scss';Restart parcel using parcel index.html. This will automatically install sass as a dev dependency, generate a CSS file and link that file in the output index.html generated in /dist folder. Parcel is a zero config bundler.
Within the index.scss, add some styles like so.
body {
    margin: 0;
}

.app {
    display: flex;
    min-height: 100vh;

    &__sidebar {
        flex: 0 0 240px;
        background-color: lightblue;
    }

    &__content {
        flex: 1;
        padding: 40px;
    }
}
The app class is a flex container which spans the entire height of the browser window. Sidebar is floated to the left with 240 pixels. And content takes the remaining space. Note the use of BEM notation.
BEM stands for Block element modifier. Here, app is a block with two elements: app__sidebar and app__content. Prefix the element classes with the block name followed by __. We will explore what a modifier is when we style our Menu component which is going to follow shortly.

Simple Menu component
Create a new file Menu.js
import React from 'react';
import { Link } from 'react-router-dom';

export default function Menu() {
    return (
        <ul className="menu">
            <li className="menu__item"><Link to="/">Home</Link></li>
            <li className="menu__item"><Link to="/about">About</Link></li>
            <li className="menu__item"><Link to="/contact">Contact</Link></li>
        </ul>
    );
}
Place this component within the sidebar in Layout.js.
<div className="app__sidebar">
    <Menu />
</div>
This should already setup a bare minimum navigation on our sidebar. Menu component has an unordered list of links. Instead of using a regular hyperlink element, we use the Link component from react router. Using the link component ensures that we use JavaScript navigation or client side navigation instead of making a request to the server.
Create a new style file menu.scss with the following code.
.menu {
    padding: 0;

    &__item {
        padding: 6px 20px;
        list-style-type: none;
        transition: background-color: 200ms;

        &:hover {
            background-color: darken(lightblue, 20%);
        }

        a {
            color: lighten(red, 20%);
            text-decoration: none;

            &:hover {
                color: lighten(red, 10%);
                text-decoration: underline;
            }

            &:active {
                color: red;
            }
        }
    }
}
Unordered list has some default padding. Remove it. Instead of each menu item, add some padding. On hovering over a menu item, darken the background color. Each menu item also has a hyperlink. Provide a color for both hover and active hyperlink style.

Problems with our Menu
There are a few problems though. When we click on the list item (other than the hyperlink), there is no navigation. There is one more problem. Which is we should highlight the active menu item. To fix both these problems, let us refactor our component.
Create an items array like so.
const items = [{
    path: '/',
    text: 'Home'
}, {
    path: '/about',
    text: 'About'
}, {
    path: '/contact',
    text: 'Contact'
}];
Use the array to render the navigation links.
export default function Menu() {
return (
<ul className="menu">
{items.map(item => (
<li key={item.path} className="menu__item">
<Link to={item.path}>{item.text}</Link>
</li>
))}
</ul>
);
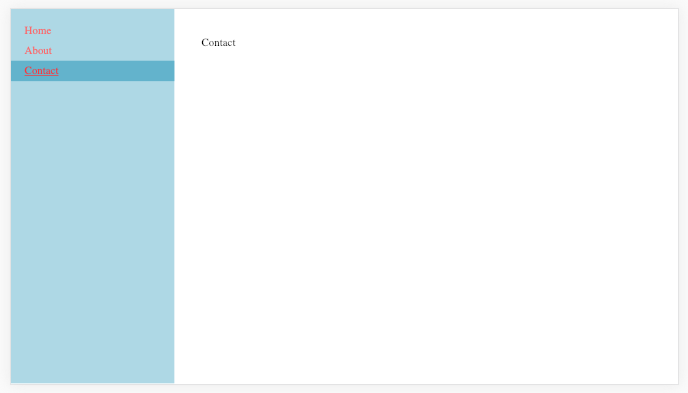
}Whenever the current pathname matches item.path, we should add another class: menu__item--active. According to BEM, this is a modifier. Suffix modifiers with --.
But how do we get the current pathname? React router has a withRouter higher order component. Wrap our component with withRouter like so.
import { Link, withRouter } from "react-router-dom";

export default withRouter(Menu);
Modify the className prop for list item like so.
className={
    props.location.pathname === item.path
        ? 'menu__item menu__item--active'
        : 'menu__item'
}
Add an active style to the list item.
&--active {
    background-color: darken(lightblue, 30%);

    a {
        color: red;
    }
}
With these changes, we should be able to see the active menu item more clearly. Now for the final touch, we add a click event handler to the menu item.
onClick={handleClick.bind(null, item.path)}Add the handleClick function to the component.
function handleClick(path) {
    props.history.push(path);
}
Whenever we want, we can manually navigate to the router path. Add a cursor: pointer to the list item.

Our Simple Menu is all good for use. With some simple SASS styles and some react router code, we were able to achieve some production level code for the component. The entire source code is available in a git repo.
Great tutorial. Bookmarked it straight away!
Hi Vijay,
Great article & very helpful indeed! Thanks.
Would you be able to provide a similar example for a menu that has child items? I am looking for a similar solution for such a menu/tree. My menu needs to look like below with <Link to for each Parent & Child Item
Home
Reports
Stock Report
MF Report
Market Report
Downloads
Software
New Versions
Release Notes
Admin Guide
Help
Contact Us
Thanks in advance.
You forgot to put props to menu.
Maybe the style-sheet does not look too good? 😛